How to get Started with Python and Raspberry Pi - A Guide for Beginners

What is covered in this guide
- Introduction: Overview of what Python and Raspberry Pi are, why they are used together, and what can be achieved with them.
- What is Python?: An introduction to Python programming, including its uses, advantages, and why it's a great language for beginners.
- What is Raspberry Pi?: An introduction to Raspberry Pi, its features, components, different models, and its uses.
- Getting Your Raspberry Pi Ready:
- Hardware Requirements: A list of all the equipment needed to set up a Raspberry Pi.
- Installing Raspberry Pi OS: A step-by-step guide on how to install the Raspberry Pi Operating System.
- Setting Up Python on Raspberry Pi: Instructions on how to access Python on Raspberry Pi and introduction to the Python interpreter.
- Your First Python Program on Raspberry Pi: Guide the reader to write, save, and run a basic Python program on Raspberry Pi.
- Learning Python Basics: Teach the basics of Python, including:
- Variables and Data Types
- Operators
- Control Flow - Conditionals and Loops
- Functions and Modules
- Interfacing with Raspberry Pi's GPIO: An introduction to GPIO pins and how to control them using Python.
- Simple Project Examples: Several beginner-friendly projects that utilize Python and Raspberry Pi, e.g., building a simple LED circuit and controlling it with Python, creating a basic weather station, etc.
- Resources for Further Learning: Provide resources (websites, books, online courses, communities) for further exploration and learning Python and Raspberry Pi. Troubleshooting and FAQs: Cover some common issues that beginners might encounter and their solutions, as well as frequently asked questions.
- Conclusion: Summarize the guide and motivate the reader to continue learning and experimenting with Python and Raspberry Pi.
Introduction: Embracing the Power of Python and Raspberry Pi
Python and Raspberry Pi: they may sound like the latest indie rock band, but they're actually two of the most powerful tools in the world of DIY computing and programming education. Individually, they each offer significant advantages for beginners and seasoned tech enthusiasts alike. When combined, they unlock an exciting world of innovation and creativity.
Python is a high-level, interpreted programming language developed in the late 1980s. Its design philosophy emphasizes code readability and simplicity, making Python an ideal language for beginners. Python's syntax allows programmers to express concepts in fewer lines of code than might be possible in languages such as C++ or Java, reducing complexity and encouraging the use of a simple, straightforward coding style.
Python is versatile and has wide applications. It's used in web development, data science, machine learning, artificial intelligence, scientific computing, and much more. But what really distinguishes Python is its extensive collection of libraries, making it a Swiss army knife for programmers.
Enter Raspberry Pi: a series of small, affordable, single-board computers developed in the UK with the intention of promoting the teaching of basic computer science in schools. Raspberry Pi offers the functionality of a full-sized computer (think word-processing, spreadsheets, high-definition video) in a package the size of a credit card. All you need to add is a keyboard, mouse, and monitor. It's both an educational tool and a blank canvas for inventors, suitable for learners, hobbyists, and professional developers.
But why use Python and Raspberry Pi together? The answer is synergy. Python's simplicity and versatility pairs well with Raspberry Pi's accessibility and flexibility. Raspberry Pi's operating system, Raspberry Pi OS (previously called Raspbian), comes pre-installed with Python. This integration offers users a ready-to-use coding environment for Python, straight out of the box.
Combining Python's coding simplicity with Raspberry Pi's functionality allows you to create a wide array of projects. You can program games, build a home automation system, create a security system, establish a weather station, or even develop a machine learning model. It's also a fantastic platform for learning about hardware interfacing, thanks to Raspberry Pi's General Purpose Input/Output (GPIO) interface. With Python, you can control these pins and interact with various hardware components like LEDs, switches, sensors, and more.
Whether you're a budding programmer, a DIY enthusiast looking to automate your home, or a tech aficionado interested in dabbling with machine learning models, the partnership of Python and Raspberry Pi provides a robust platform for realizing your ideas. This guide aims to equip you with the knowledge and skills needed to get started on this fascinating journey. So let's dive in, and explore the incredible potential that awaits with Python and Raspberry Pi.
What is Python?: An Introduction to the Swiss Army Knife of Programming Languages
Imagine a language that's easy to learn, encourages simple and clean coding habits, yet is powerful enough to build complex systems. This is Python, a high-level, interpreted programming language named not after the snake, but after the British comedy group Monty Python.
Python was created by Guido van Rossum, and first released in 1991. Designed with code readability in mind, Python uses significant whitespace and has a syntax that allows programmers to express concepts in fewer lines of code than in languages such as C++ or Java. It supports multiple programming paradigms, including procedural, object-oriented, and functional programming.
But why is Python so widely used? The answer lies in its versatility and simplicity. Python's simplicity makes it a great first programming language. Its syntax is designed to be readable and straightforward, which reduces the cost of program maintenance. Python also emphasizes simplicity and minimizes the complexity of coding, making it easier for beginners to grasp.
Yet, don't mistake Python's simplicity for lack of power. It's used in a myriad of professional applications. Web developers use Python frameworks like Django and Flask to build their sites. Data scientists and analysts use Python for collecting, analyzing, and visualizing data. Python is instrumental in machine learning, artificial intelligence, and natural language processing because of libraries like TensorFlow, Keras, and NLTK.
Python also shines in automation and scripting tasks, where Python scripts can automate routine tasks and save time. For instance, Python can be used to automatically organize files in your computer, scrape data from websites, or even automate email and SMS notifications.
One of Python's key advantages is its rich ecosystem of libraries and frameworks. These resources extend Python's functionality, reduce development time, and allow Python to interact with a variety of systems. For example, NumPy and Pandas simplify data analysis, while Matplotlib allows data visualization. Libraries like Pygame make game development accessible, and Flask and Django are excellent for web development.
Python's advantages also include a large and vibrant community of developers who contribute to an ever-growing selection of libraries and frameworks, and who provide invaluable support, tutorials, and advice. Python also has strong corporate sponsorship, with tech giants like Google, Facebook, and NASA using Python and contributing to its development.
Lastly, Python's universal appeal is enhanced by its portability and extensibility. Python can run on various types of systems, including Windows, Mac OS, and Linux, and it can be used in conjunction with other languages.
In summary, Python is a versatile and powerful language that remains accessible to beginners. Whether you aim to get into web development, data science, AI, or simply want to automate mundane tasks, Python is an excellent language to start your coding journey. Its readability and simple syntax make it a joy to learn, and its wide range of uses make it a skill that will remain relevant in many areas of technology. With Python, you're not just learning a programming language; you're gaining a tool that can bring your ideas to life.
What is Raspberry Pi?: Your Compact Gateway to Digital Creation
Imagine having a full-fledged computer in the palm of your hand. That's the magic of Raspberry Pi: a credit-card-sized wonder that opens the doors to an exciting world of learning and innovation.
Raspberry Pi is a series of single-board computers developed in the United Kingdom by the Raspberry Pi Foundation. Originally designed to promote teaching basic computer science in schools, Raspberry Pi has exceeded its mandate and is now used by people of all ages to explore computing and digital making.
Raspberry Pi has all the functionalities you would expect from a desktop computer: it can connect to a monitor or a television, interface with a mouse and keyboard, run different kinds of software, and connect to the internet. Yet, it does so in an incredibly small and affordable package.
A typical Raspberry Pi board comes equipped with several components:
- CPU (Central Processing Unit): This is the brain of your Raspberry Pi, responsible for executing instructions from software.
- RAM (Random Access Memory): This is where the Pi stores temporary data that it needs quick access to.
- **GPIO (General-Purpose Input/Output) Pins: These are a set of connectors that Raspberry Pi uses to interact with other electronic devices, like sensors, motors, and even other computers.
- USB Ports: These are used to connect peripheral devices, such as a mouse, keyboard, or external storage.
- Ethernet and Wi-Fi: For wired and wireless internet connectivity.
- HDMI Port: To connect to a display device like a monitor or TV.
- MicroSD Card Slot: This is where the operating system (like Raspberry Pi OS) and file storage reside.
The Raspberry Pi family includes a variety of models, each with different specifications and features. These range from the high-performance Raspberry Pi 4 Model B, with up to 8GB of RAM, to the ultra-small Raspberry Pi Zero, which is even smaller and cheaper than the standard model. There's also the Raspberry Pi 400, which comes integrated into a compact keyboard.
Raspberry Pi's uses are as diverse as its user base. It can serve as a basic desktop computer for web browsing, word processing, and watching videos. Yet its real power lies in its versatility and open-ended design, which encourage experimentation and learning. With the ability to connect to a variety of sensors and actuators via its GPIO pins, Raspberry Pi is a favorite tool for building digital maker projects. These can range from simple LED light shows, to robotics, to home automation systems, to servers, to weather stations, and much more.
Moreover, it's an ideal platform for learning programming, especially Python. In fact, Python is the recommended language for beginners on Raspberry Pi due to its simplicity and power.
In short, Raspberry Pi is much more than a cheap, tiny computer. It's a platform for learning, creativity, and invention. With a Raspberry Pi, you're not just consuming technology, you're actively creating with it, whether you're a student, a hobbyist, a professional developer, or simply someone who loves to tinker. As you embark on your Raspberry Pi journey, remember: the sky's the limit.
Getting Your Raspberry Pi Ready: Equip It, Set It Up, and Let It Run
Now that we've delved into the worlds of Python and Raspberry Pi, it's time to get our hands dirty. Let's prepare your Raspberry Pi for the exciting journey ahead.
Hardware Requirements
Before we start, make sure you have the following items:
- Raspberry Pi: Choose the model that best suits your needs. For beginners, the Raspberry Pi 4 Model B is a good choice due to its robust performance and features.
- MicroSD Card: Raspberry Pi uses this as its main storage device. A minimum of 8GB is recommended, but 16GB or 32GB allows more space for projects and files.
- MicroSD Card Reader: To install the operating system on the MicroSD card.
- Power Supply: A good quality power supply that matches your Raspberry Pi's power requirements. For Raspberry Pi 4, a USB-C power supply with at least 3A at 5V is recommended.
- Monitor/TV: Any screen with an HDMI input.
- HDMI Cable: For Raspberry Pi 4, a Micro HDMI to standard HDMI cable is needed.
- Keyboard and Mouse: These can be either wired (USB) or wireless.
- Internet Connection: Either via Ethernet or Wi-Fi.
- Case (Optional): A case can protect your Raspberry Pi from physical damage and dust.
Installing Raspberry Pi OS
After you have gathered all your equipment, it's time to install the Raspberry Pi Operating System (Raspberry Pi OS, previously called Raspbian). Here is a step-by-step guide or use our How to Setup Your Raspberry Pi - A Comprehensive Step-By-Step Guide:
Step 1: Download the Raspberry Pi Imager
Go to the Raspberry Pi's official downloads page and download the Raspberry Pi Imager for your operating system (Windows, macOS, or Ubuntu).
Step 2: Install Raspberry Pi Imager
Run the downloaded file and follow the instructions to install the Raspberry Pi Imager.
Step 3: Choose the OS
Insert your MicroSD card into your computer using the MicroSD card reader. Open Raspberry Pi Imager, click on 'CHOOSE OS', and select 'Raspberry Pi OS (32-bit)' from the list.
Step 4: Choose the SD Card
Click on 'CHOOSE SD CARD', and select your MicroSD card from the list.
Step 5: Write the OS to the SD Card
Click on 'WRITE'. Raspberry Pi Imager will then download the OS and write it to your MicroSD card. This process may take a while, so be patient.
Step 6: Insert the MicroSD Card into the Raspberry Pi
Once the writing process is complete, remove the MicroSD card from your computer, insert it into your Raspberry Pi, and power it up.
Congratulations! You've just installed Raspberry Pi OS and are ready to explore the wonderful world of Raspberry Pi. In the next sections, we'll dive deeper into using Python on your Raspberry Pi and start some exciting projects. Enjoy your journey!
Setting Up Python on Raspberry Pi: Starting Your Coding Journey
Having set up your Raspberry Pi, we now turn our attention to Python. Luckily, Raspberry Pi OS comes with Python pre-installed. This makes the transition to the programming side of things relatively smooth.
Accessing Python on Raspberry Pi
Raspberry Pi OS comes with two versions of Python: Python 2 and Python 3. Python 2 is an older version, and its support has been discontinued as of January 2020. As a beginner, you should focus on Python 3, which is the latest and supported version.
You can access Python 3 through the Terminal (command line interface) or Thonny Python IDE (Integrated Development Environment), which is a more user-friendly option for beginners. Here's how to access both:
Terminal:
- Open Terminal by clicking on the Terminal icon at the top of the screen.
- Type python3 and press Enter. This command starts the Python 3 interpreter.
Thonny Python IDE:
- Click on the Raspberry icon at the top left corner of the screen.
- Navigate to Programming > Thonny Python IDE to open the application.
Now you're ready to write some Python code!
Introduction to the Python Interpreter
The Python interpreter is a program that reads and executes Python code. Depending on your previous programming experience, this console environment might seem strange, but it's a powerful tool for learning Python.
Here's a quick demonstration. In your Python interpreter, whether it's in the Terminal or Thonny Python IDE, type the following command and press Enter:
print("Hello, world!")
You should see the message "Hello, world!" appear on the screen. Congratulations! You've just written and executed your first line of Python code.
This "Hello, world!" program is a traditional first program when learning a new language. The print() function in Python outputs the value inside the parentheses to the console.
Python interpreter is an excellent place to experiment with Python code. It allows you to enter Python commands directly, executes them immediately, and provides immediate feedback. This interactive nature of Python interpreter makes it a great learning tool.
You can perform mathematical operations, define variables, control structures, and even define functions in the interpreter. Here's another example:
x = 5
y = 10
z = x + y
print(z)
When you press Enter after typing print(z), the interpreter will print the number 15, the result of adding 5 and 10.
Remember, Python is an interpreted language, so it executes code line-by-line. This means if there is an error in your code, Python will stop and report the error, allowing you to fix it before proceeding.
Now that Python is set up on your Raspberry Pi, you're ready to start creating with Python. In the upcoming sections, we'll take a deeper look at Python's syntax, programming concepts, and how to create simple projects on your Raspberry Pi. Welcome to the world of coding!
Your First Python Program on Raspberry Pi: Unleashing Your Digital Creativity
Having prepared the playground with Python and Raspberry Pi, it's time to dive into creating your first Python program. We'll write a simple program, save it, and then run it.
Writing Your Python Program
Let's write a basic Python program. We'll use Thonny Python IDE for this, as it offers a user-friendly interface for beginners.
- Open Thonny Python IDE by navigating to Programming > Thonny Python IDE.
- Once Thonny is open, you'll see a large white space. This is your text editor, where you'll write your Python code.
- Type the following Python code into the text editor:
name = input("What's your name? ")
print("Hello, " + name + "! Welcome to Python programming on Raspberry Pi!")
This program asks for your name and then prints a personalized welcome message. The input() function takes user input (what you type), and print() displays a message on the screen.
Saving Your Python Program
After writing the program, you need to save it. Here are the steps:
- Click on File > Save in Thonny.
- Choose a directory where you want to save your Python script. It's often a good practice to have a dedicated folder for your Python programs.
- Enter a filename, for example, welcome.py. The .py extension indicates that this is a Python file.
- Click Save.
Congratulations, you've just written and saved your first Python program!
Running Your Python Program
Now it's time to see your creation in action:
- Ensure your Python script is open in Thonny.
- Click on Run > Run current script or use the shortcut F5.
- Thonny will switch to the "Shell" tab at the bottom, which displays the output of your program. You'll see the text "What's your name?" there.
- Type your name and press Enter.
- Your program will respond with "Hello, [your name]! Welcome to Python programming on Raspberry Pi!"
Running a program is as simple as that. Each time you modify your code, make sure to save your changes before running the program again.
Understanding Your Python Program
You may wonder how the small program you wrote works. Let's break it down:
- The input("What's your name? ") function displays a prompt ("What's your name?") and waits for the user to type something and press Enter. The input is returned as a string (text data).
- name = ... assigns the user's input to a variable named name. You can think of a variable as a box where you can store a value.
- print("Hello, " + name + "...") prints a personalized message to the user. The + symbol is used to concatenate (join) strings together.
You've now created your first Python program on Raspberry Pi! This is just a glimpse into the vast possibilities of Python. As we progress, you'll learn how to use Python for creating interactive programs, automating tasks, connecting to electronic components, and much more. Enjoy the ride!
Learning Python Basics: Building Blocks of Your Coding Journey
Having gotten your feet wet with a simple Python program, it's time to dive deeper into the language's core concepts. These building blocks, including variables, data types, operators, control flow, and functions, will lay the foundation for more complex and powerful Python programming.
Variables and Data Types
A variable in Python is like a container used to store a value. The value can be a number, text (also known as a string), a list of items, or even a function. Here's how you declare a variable:
x = 10
name = "Alice"
Python has several basic data types:
- Integers (int): Whole numbers such as 5, -10, or 1000.
- Floating-Point Numbers (float): Numbers with a decimal point such as 5.0, -10.5, or 3.14.
- Strings (str): Textual data. You denote strings by enclosing text in quotes. Python accepts both single and double quotes, but they must match at both ends. For example, "Hello" or 'Hello'.
- Booleans (bool): Logical values denoting True or False. They're useful for conditions in control flow, which we'll cover soon.
integer = 10
floating_point = 20.5
text = "Hello, world!"
truth_value = True
Operators
Operators are symbols that perform operations on variables and values. Python has several types of operators:
- Arithmetic Operators: Perform mathematical operations.
x = 10
y = 2
print(x + y)  # 12, addition
print(x - y)  # 8, subtraction
print(x * y)  # 20, multiplication
print(x / y)  # 5.0, division
print(x % y)  # 0, modulus (remainder of the division of x by y)
print(x ** y) # 100, exponentiation
print(x // y) # 5, floor division (division that rounds down)
- Comparison Operators: Compare two values and return a Boolean (True or False).
x = 10
y = 2
print(x == y)  # False, equal
print(x != y)  # True, not equal
print(x > y)   # True, greater than
print(x < y)   # False, less than
print(x >= y)  # True, greater than or equal to
print(x <= y)  # False, less than or equal to
- Logical Operators: Perform logical operations, often used with Booleans.
x = True
y = False
print(x and y)  # False
print(x or y)   # True
print(not x)    # False
Control Flow: Conditionals and Loops
Control flow is the order in which the computer executes statements in a script. Python uses conditional statements and loops to control the flow of its programs.
- Conditional Statements: These are the 'if', 'elif' (else if), and 'else' statements. They allow your program to make decisions based on conditions.
x = 10
if x > 0:
    print("x is positive")
elif x < 0:
    print("x is negative")
else:
    print("x is zero")
- Loops: Python has two types of loops - 'for' and 'while'. 'For' loops are used for iterating over a sequence (like a list or a string), while 'while' loops keep looping as long as a condition is True.
For loop
for i in range(5):
    print(i)  # prints numbers 0 through 4
While loop
x = 5
while x > 0:
    print(x)
    x -= 1  # prints numbers 5 through 1
Functions and Modules
Functions in Python are blocks of reusable code that perform specific tasks. You define a function using the 'def' keyword.
def greet(name):
    print("Hello, " + name + "!")

greet("Alice")  # prints "Hello, Alice!"
Python also has many built-in modules (libraries of code) that provide additional functionalities. For example, the 'math' module provides mathematical functions and constants.
import math
print(math.sqrt(16))  # prints "4.0", the square root of 16
You've now covered the basics of Python. These concepts form the backbone of most Python programs, and mastering them will set you up for success in your Python programming journey. Next, we'll explore how to use these concepts to build more complex programs on your Raspberry Pi.
Interfacing with Raspberry Pi's GPIO: Tapping into the Power of Physical Computing
Raspberry Pi isn't just a mini-computer; it also interacts with the physical world through General Purpose Input/Output (GPIO) pins. These pins allow your Raspberry Pi to interface with a variety of hardware components such as LEDs, buttons, sensors, and more. Learning how to control GPIO pins using Python opens the door to a wide range of projects and applications.
Understanding GPIO Pins
The Raspberry Pi has a set of GPIO pins along the edge of the board. The exact number and functionality depend on the model, but all Raspberry Pi's have at least 17 GPIO pins. These pins are a physical interface between the Raspberry Pi and the outside world.
GPIO pins can be set to one of two states: HIGH or LOW. When a pin is HIGH, it outputs 3.3V of electricity. When it's LOW, it outputs 0V. A pin can also be configured as an input, allowing it to receive electrical signals.
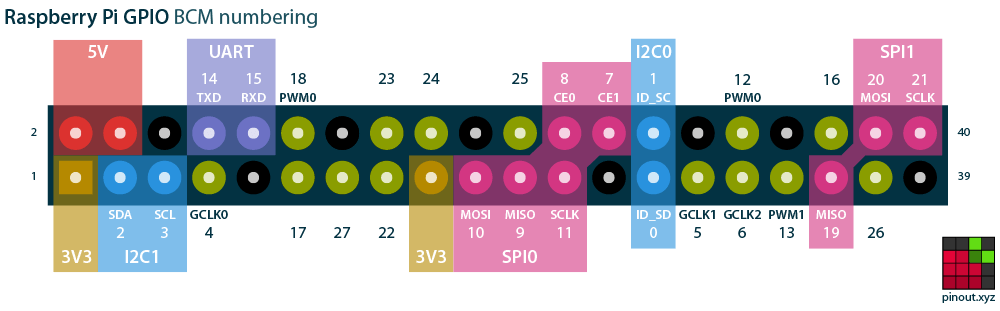
Image Source: pinout.xyz
Controlling GPIO Pins Using Python
The GPIO pins can be controlled using Python through a library called RPi.GPIO, which is included in Raspberry Pi OS.
Before you can use the GPIO pins, you need to import the library and set up the GPIO mode. There are two ways of numbering the IO pins on a Raspberry Pi within RPi.GPIO: BOARD and BCM. BOARD refers to the pins by the number of the pin in the plug, and BCM refers to the pins by the "Broadcom SOC channel" number.
Here's a simple example of how to use the RPi.GPIO library to control a GPIO pin:
import RPi.GPIO as GPIO  # Import the library
GPIO.setmode(GPIO.BOARD)  # Set pin numbering system to BOARD

pin = 10 # The pin number will depend on your connection
GPIO.setup(pin, GPIO.OUT)  # Set your chosen pin to an output

GPIO.output(pin, GPIO.HIGH) # Set the pin to HIGH so it outputs 3.3V

GPIO.output(pin, GPIO.LOW) # Set the pin to LOW so it outputs 0V

GPIO.cleanup() # Always clean up at the end of your script
Remember, always ensure that your script cleans up the GPIO settings before it exits, using GPIO.cleanup(). This will ensure that the pins are returned to their default states.
Safety with GPIO Pins
While experimenting with GPIO pins, bear in mind these key safety considerations:
- Raspberry Pi's GPIO pins operate at 3.3V. Providing a higher voltage can damage the board.
- The maximum current that a GPIO pin can source (provide to other devices) or sink (draw from other devices) is about 16 mA. Ensure not to draw too much current to avoid damaging the board.
- Always turn off the power to your Raspberry Pi before connecting or disconnecting anything.
Python's ability to control GPIO pins enables your Raspberry Pi to interact with the world in exciting ways. By combining the principles of programming and electronics, you can create devices that respond to the environment, control other hardware, or interact in real time. The possibilities are endless!
Simple Project Examples: Unleashing the Power of Python and Raspberry Pi
With a good grasp of Python and an understanding of Raspberry Pi's GPIO, you're ready to embark on your own projects. To get you started, here are two beginner-friendly projects that effectively utilize both Python and Raspberry Pi.
- Building and Controlling a Simple LED Circuit
In this project, we'll control an LED using Python and Raspberry Pi's GPIO pins. This simple project is an excellent way to learn about basic electronic components and Python's control over GPIO.
Hardware Requirements:
- Raspberry Pi with Python and GPIO setup
- 1 LED
- 1 220Ω resistor
- Breadboard and jumper wires
Steps:
- Build the LED circuit: Connect the LED to your Raspberry Pi. The long leg (anode) of the LED should go to GPIO pin 10 through a resistor, and the short leg (cathode) to a Ground pin on the Raspberry Pi.
- Code the Python script: Use the previous GPIO control example as a base. Set the pin to HIGH to turn on the LED and LOW to turn it off. You can experiment with Python's time module to blink the LED.
- Creating a Basic Weather Station
A weather station is a more advanced project that uses sensors to measure environmental conditions like temperature and humidity. In this project, we'll use the DHT11 sensor to collect temperature and humidity data.
Hardware Requirements:
- Raspberry Pi with Python and GPIO setup
- DHT11 sensor
- Breadboard and jumper wires
Steps:
- Connect the DHT11 sensor: Connect the sensor's VCC pin to a 5V pin on the Raspberry Pi, the GND pin to a Ground pin, and the Data pin to GPIO pin 4.
- Install the necessary Python library: The Adafruit_DHT library can read data from the DHT11 sensor. Install it using pip: pip3 install Adafruit_DHT.
- Code the Python script: Use the Adafruit_DHT library to read data from the sensor and print it out.
import Adafruit_DHT

DHT_SENSOR = Adafruit_DHT.DHT11
DHT_PIN = 4
humidity, temperature = Adafruit_DHT.read(DHT_SENSOR, DHT_PIN)
if humidity is not None and temperature is not None:
    print("Temp={0:0.1f}C Humidity={1:0.1f}%".format(temperature, humidity))
else:
    print("Sensor failure. Check wiring.");
These simple projects serve as an exciting introduction to the world of physical computing, combining software and hardware. As you grow more comfortable, you can start tackling more complex projects, like building a home automation system, a robot, or a game console. The possibilities with Python and Raspberry Pi are endless and limited only by your imagination!
Resources for Further Learning: Deepening Your Python and Raspberry Pi Knowledge
While this guide provides a good starting point, Python and Raspberry Pi's power truly shines when you explore their depth and versatility. To assist you in your journey, here are some top resources for further learning and exploration:
Websites
- Python.org: The official Python website offers many resources, including detailed documentation, tutorials, and community forums.
- Raspberry Pi Foundation: The official Raspberry Pi website provides numerous resources, tutorials, project ideas, and community discussions.
- W3Schools Python Tutorial: This comprehensive online tutorial covers almost every aspect of Python programming.
- Real Python: This website offers Python tutorials, articles, and resources aimed at practical, real-world applications.
Books
- "Python Crash Course" by Eric Matthes: This book provides a hands-on, project-based introduction to Python.
- "Automate the Boring Stuff with Python" by Al Sweigart: This book teaches Python programming with the aim of automating common computer tasks.
- "Raspberry Pi Cookbook" by Simon Monk: This book explores the hardware and software capabilities of the Raspberry Pi, including numerous project ideas.
- "Learning Python with Raspberry Pi" by Alex Bradbury and Ben Everard: This book focuses on learning Python through Raspberry Pi applications.
Online Courses
- Codecademy's Python Course: An interactive Python course for beginners.
- Coursera's Python for Everybody: A comprehensive course offered by the University of Michigan.
- Raspberry Pi: Full Stack on Udemy: This course is a deep dive into the Raspberry Pi environment.
- Introduction to Raspberry Pi on Coursera: A course offered by UC Irvine that covers the basics of Raspberry Pi and Python.
Communities
- Raspberry Pi Stack Exchange: A question and answer site for users and developers of Raspberry Pi.
- Python Reddit (r/Python): A community for news about Python, as well as sharing projects and asking questions.
- Raspberry Pi Reddit (r/raspberry_pi): A platform for discussing news, projects, and questions about Raspberry Pi.
- Python Community on Discord): An active, helpful community for Python learners and experts alike.
Remember, the best way to learn Python and Raspberry Pi is by doing. Don't be afraid to experiment, make mistakes, and tackle projects slightly out of your comfort zone. Keep learning, stay curious, and have fun on your journey!
Troubleshooting and FAQs: Navigating Common Challenges with Python and Raspberry Pi
In the process of learning and exploring Python and Raspberry Pi, you're bound to encounter some issues. However, don't worry! Many of these challenges have well-documented solutions. Here are some common problems and their fixes, along with frequently asked questions:
Troubleshooting
- Python Script Won't Run
-
Ensure that Python is installed correctly: You can verify the installation by
typing python3--versioninto the terminal. You should see Python's version number. - Check for syntax errors in your code: Python will not run your script if there are syntax errors. Make sure all parentheses, quotes, colons, and indentations are correct.
- Raspberry Pi Won't Boot
- Check your power supply: Raspberry Pi needs a steady power supply. Ensure that your power source is capable of providing at least 2.5A for Pi 3 and 3.0A for Pi 4.
- Ensure your SD card is working: The SD card may be corrupt or not inserted properly. Try reinserting it or using a different SD card.
- GPIO Not Working as Expected
- Check your physical connections: A loose or incorrect connection could be the problem.
- Ensure you've set up the GPIO pins in your code correctly: Check your pin mode (BOARD or BCM) and whether you've set the pin as input or output as needed.
- Ensure you're using the correct pin numbers: The pin numbers depend on whether you've set the pin mode to BOARD or BCM.
Frequently Asked Questions
- Can I use Python for all Raspberry Pi projects?
While Python is an excellent choice due to its simplicity and the extensive support in Raspberry Pi community, some projects may benefit from other languages. For example, time-critical applications might need the speed of C or C++.
- How can I run a Python script automatically at startup?
You can use a feature called cron or the rc.local file to run scripts at startup. For complex scripts, consider creating a systemd service.
- Why does my Raspberry Pi overheat?
Raspberry Pis can overheat if they're processing intensive tasks for long periods. To prevent this, make sure your Raspberry Pi is in a well-ventilated area. You could also use heat sinks or a fan for cooling.
- Is it possible to use multiple programming languages in a single Raspberry Pi project?
Yes, it's possible. For instance, you can write the bulk of your program in Python and use C or C++ for time-sensitive tasks.
Learning to troubleshoot issues and find answers to your questions is a vital part of becoming proficient in Python and Raspberry Pi. Remember, every problem you encounter is an opportunity to learn more about how these systems work. When in doubt, the Python and Raspberry Pi communities are excellent resources for finding help and guidance.
Conclusion: Embarking on Your Python and Raspberry Pi Journey
As we reach the end of this guide, you've learned what Python and Raspberry Pi are, how to set them up, and how to begin coding with Python. We've also touched upon the Python programming fundamentals, learned how to interface with Raspberry Pi's GPIO pins, and even walked through some simple yet exciting Python-based Raspberry Pi projects. Additionally, we've shared resources for further learning and addressed common troubleshooting issues and FAQs.
Remember, this guide is just the beginning of your journey with Python and Raspberry Pi. Python is one of the most versatile and widely used programming languages, and Raspberry Pi is an incredibly powerful piece of hardware. Combined, they offer endless opportunities for creative, practical, and fun projects, from automation and robotics to data analysis and web development.
Though we've covered a lot of ground, there's still much more to learn. For instance, you might want to explore how to use Python's powerful libraries like NumPy for numerical computations, pandas for data manipulation, or Flask for web development. As for Raspberry Pi, you could delve into setting up a home media server, creating a VPN, or even building a retro gaming console.
As you continue your journey, don't be afraid to experiment, make mistakes, and tackle complex projects. As the saying goes, "The best way to learn is by doing." The more you practice and apply what you've learned, the more comfortable you'll become.
Also, remember to share your work with others. The Python and Raspberry Pi communities are known for being open, collaborative, and supportive. Sharing your projects not only contributes to this community spirit, but it can also lead to valuable feedback and learning opportunities.
Finally, have fun! Learning to program and working with hardware like Raspberry Pi should be an enjoyable, rewarding experience. Embrace the challenges, celebrate your successes, and enjoy the process.
Here's to your journey with Python and Raspberry Pi - may it be filled with discovery, creativity, and joy!